The difficult part to use the Google Gmail API is not to use the API itself, but to set up your project to have the proper authorization tokens.
This API relies on the oAuth2 protocol to grant access to your gmail account, and the end goal is to have an access token, and a refresh token to access your gmail account.
The OAuth2 terminology may seems confusing at first but the protocol makes more sense when you understand the different parties involved in the process:
- resource owner: that’s you. You own the gmail account and you need at some point to manually authorize the access to your mail box
- client: this is the application which wants to access your email account. In the context of a CLI node application, this is not a real application per se - there is for instance no user interface for that application, but this is still an entity that you need to create.
- scope: a scope is the mechanism by which you limit the permissions you grant the client. For instance, you may want to give the client only the permission to read your emails but not to send one. During the authorization process, you, the resource owner, will be presented with the list of permissions that the client is asking so that you can review them before granting access
- authorization server: this is the server that you will connect to where you, the resource owner, will grant access to your gmail account. This server is hosted by Google and you can trust that server with your credentials.
- resource server: this is also a Google server which will be the server giving access to your mail box, and that will check your access token to confirm that you have the rights to perform the operations.
Create the client application
In the google documentation page, there is a button labeled “Enable the Gmail API” which does exactly that, but we will describe here the steps which are performed behind the scene.
This will make it easier, in a subsequent article, to describe hot to add the pub/sub API.
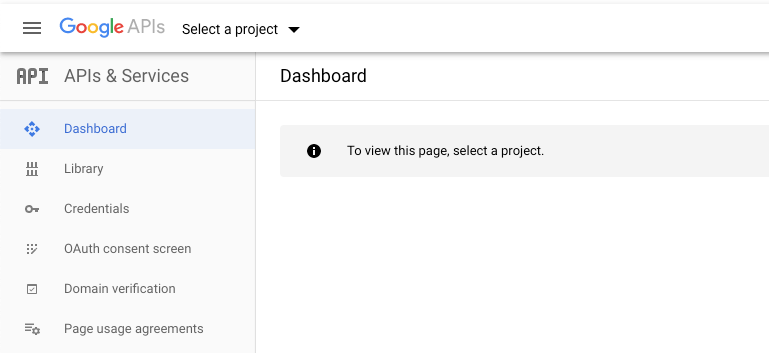
You first need to log into the Google Cloud Platform dashboard at: https://console.developers.google.com/apis/dashboard
Create a Google Cloud project
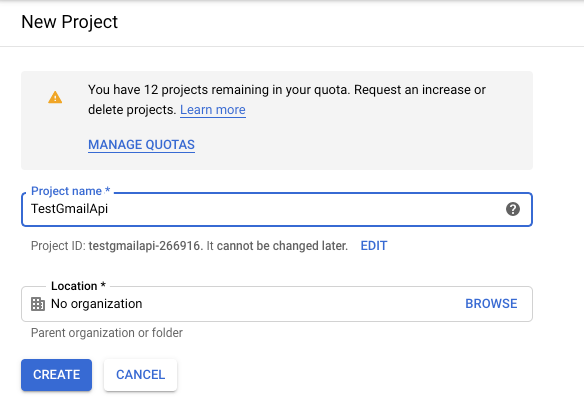
This Dashboard will have a “Select a project” menu which will allow you to create an application:
select that menu, and create a new project:
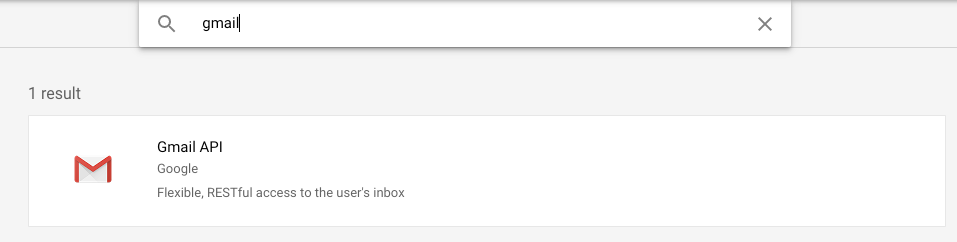
Enable the Gmail API for your project
The application will now appear in the console, and will tell you how to enable APIs:

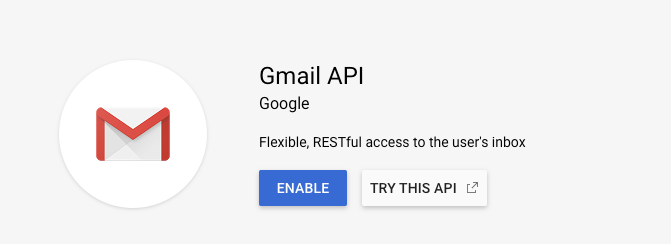
You want to add the Gmail API:
and ENABLE it
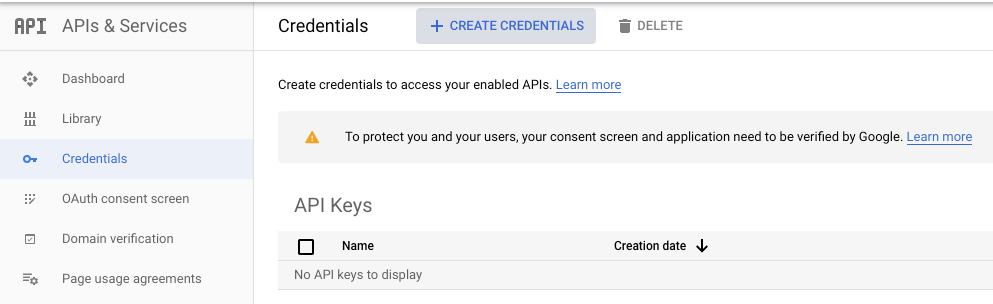
Create credentials for your Gmail API
As prompted at the top of the screen, you need to get some credentials:

This step is a bit confusing.
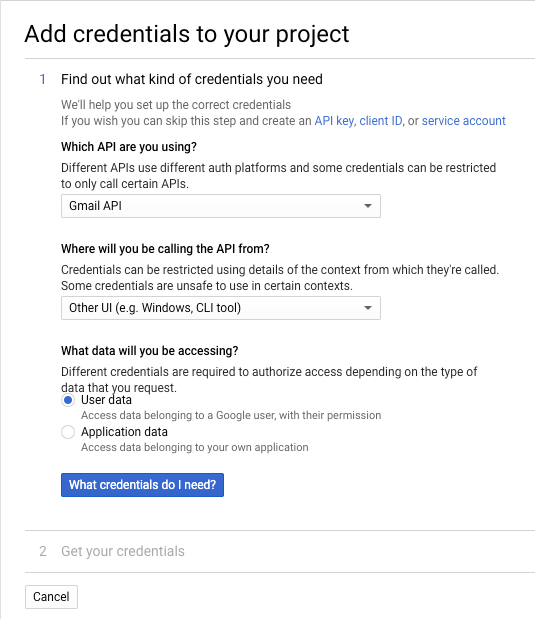
The confusing part is that you need to click that What credentials do I need? button to move forward:
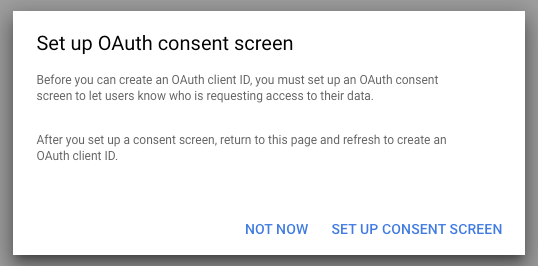
Setup the Gmail conset screen for your application
you click on the “SET UP CONSENT SCREEN” button
If you have a private gmail account, the only available option is External:

and finally, you have this long form where you can provide more information about the application/client.
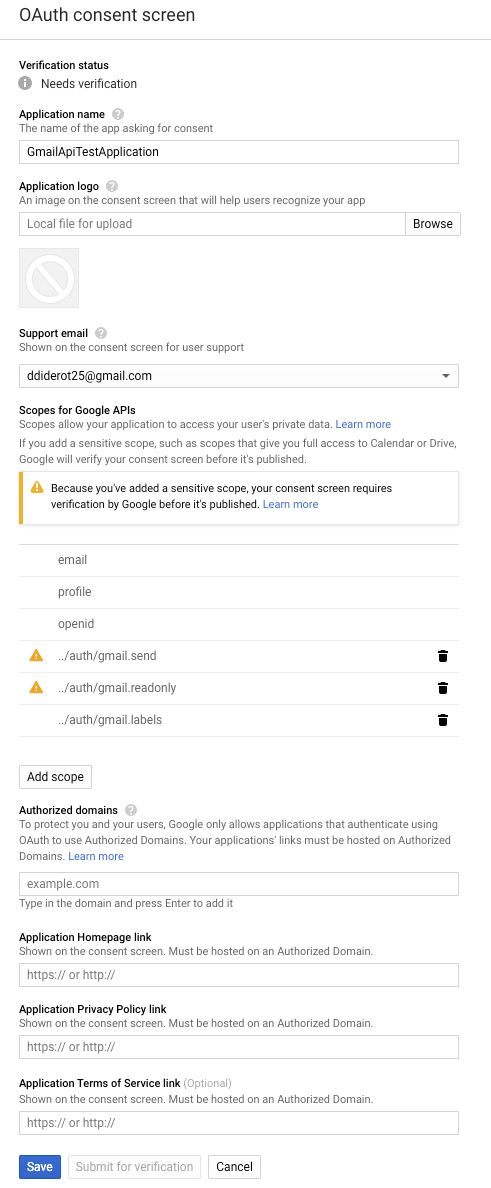
The Add scope button allows you to list the permissions that you want for your application.
Note: we’ll see that, when programmatically getting the tokens, you also need to provide the scopes in the authorization API, so it is not totally clear if it is required to set the scopes here in the form.
The form will display warnings about the fact that your app is not verified and, as described in that document , there will be restrictions associated to this application.
The good news is that this is not an issue for what we want to do, which is to get tokens for a CLI application.
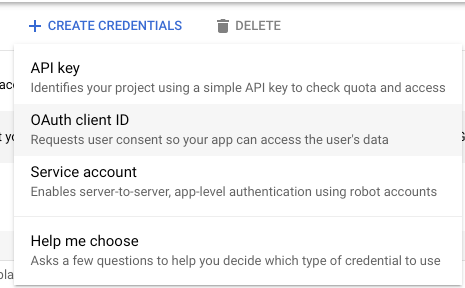
Download your credentials
You then go back to your dashboard, in the “Credentials” section to create credentials:
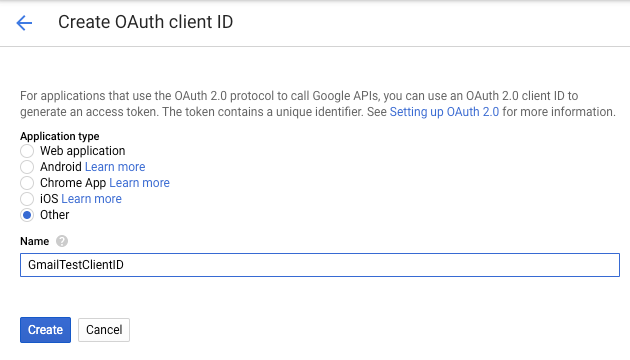
You need to select the OAuth client ID option:
This will prompt you with this screen:
and, finally, you will get the Client ID and secret that you need to start using the Google Node API.
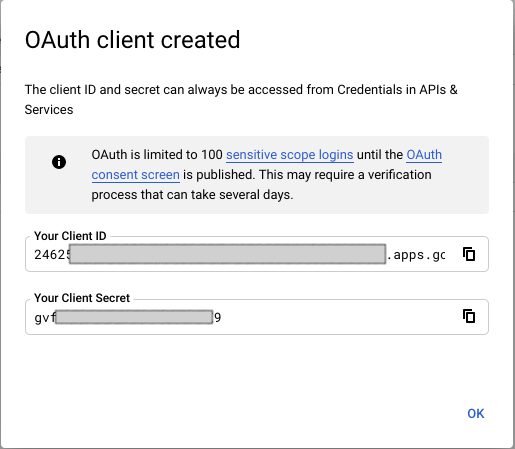
Back on the dashboard/credentials page, you will be able to download those credentials:

Save those credentials in a file called credentials.jsonYou will need this file in the next step.
Using the google node authorization API
The credentials you collected before must be kept secret: they will be used to collect the access tokens which will allow your program to access your mailbox.
The google node API documentation here shows a program to list the labels of your mail box.
The problem with that example is that it does 2 things at once:
- get the access and refresh tokens
- use those tokens to use the gmail API
I split the program in 3 parts to make it easier to reuse:
- a program to get the access tokens, through the authentication URL, and store those tokens ina
token.jsonfile - a utility function which generate a OAuth2Client to authenticate any API call
- 2 examples of programs using the GMail API (one to get the list of lables, the other one to send an email), using the utility described above
Get an access token and a refresh token
Initialize the oAuth api
In the code below, credentials.installed is the object read from your credentials.json file
const {client_secret, client_id, redirect_uris} = credentials.installed;
const oAuth2Client = new google.auth.OAuth2(
  client_id, client_secret, redirect_uris[0]);
Get the authorization URL
You, as the owner of the mailbox, need to grant access to the API. To do so you need an authorization URL:
const authUrl = oAuth2Client.generateAuthUrl({
  access_type: 'offline',
  scope: SCOPES,
});
the access_type is offline because we will be calling the API from the command line.
SCOPES is an array containing the permissions you want for the API calls.
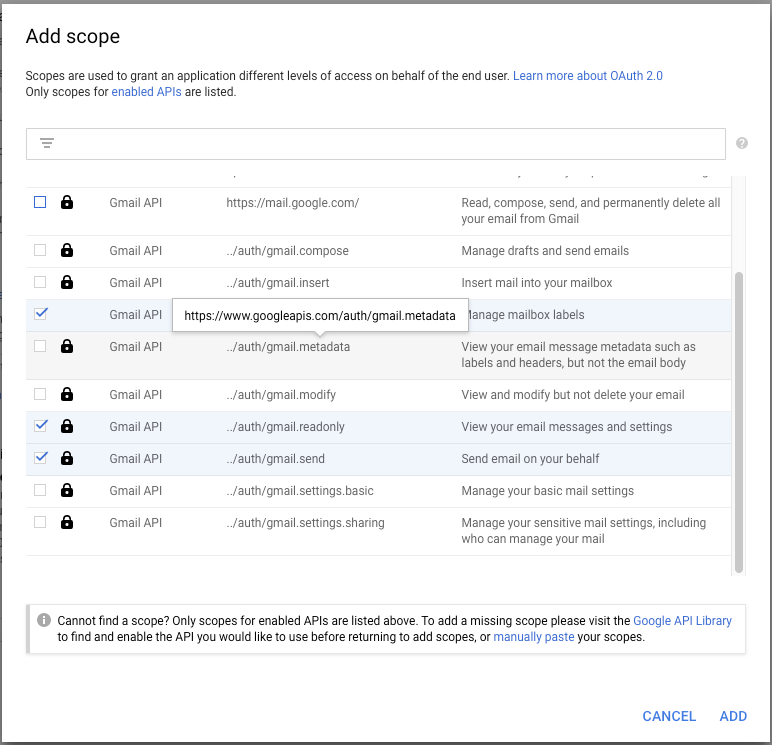
The list of scopes for the gmail API is available here.
If you check the API reference, you will see, for each API, the scopes which are required to call that API.
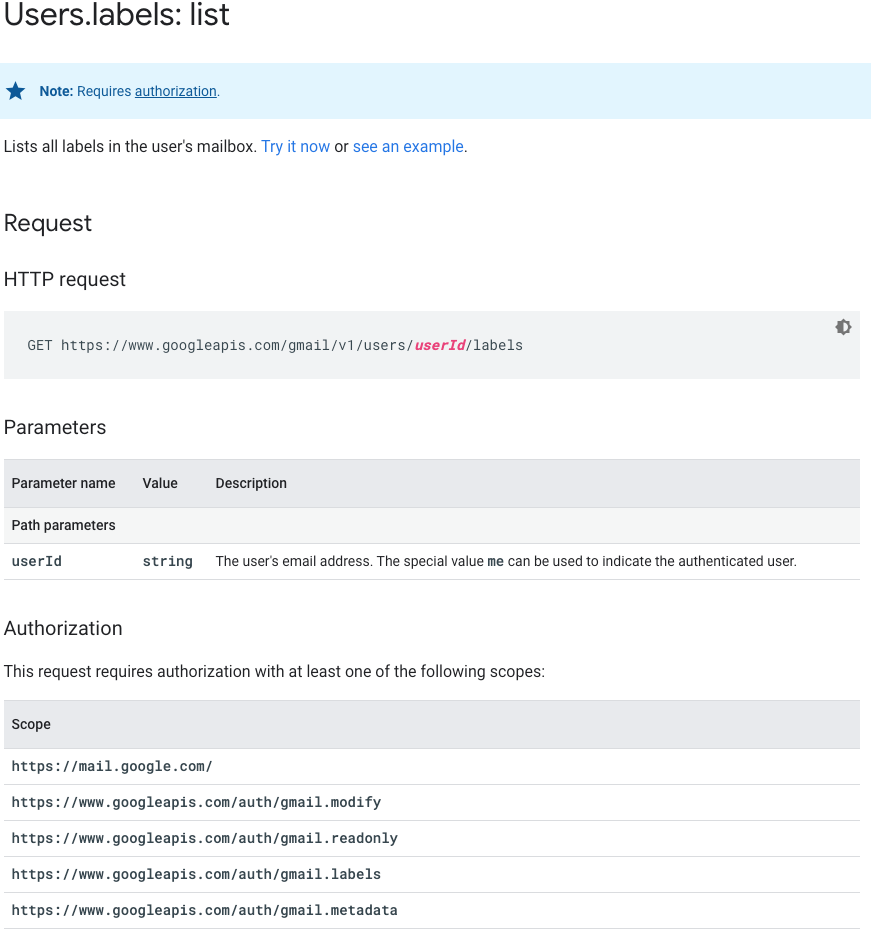
For instance, if you want to read the labels of your mailbox, the documentation will show you the scopes needed:
For the scope (I know…) of this demo, we will use those scopes:
- https://www.googleapis.com/auth/gmail.labels
- https://www.googleapis.com/auth/gmail.send
- https://www.googleapis.com/auth/gmail.readonly
As usual, the rule of thumb is to request for the minimal set of scopes to limit the security exposure of your application.
The code of the program to access the token is a small modification of the example provided by Google where I removed the code which was actually calling the gmail API:
const fs = require('fs');
const readline = require('readline');
const { google } = require('googleapis');

// If modifying these scopes, delete token.json.
const SCOPES = [
  'https://www.googleapis.com/auth/gmail.readonly',
  'https://www.googleapis.com/auth/gmail.send',
  'https://www.googleapis.com/auth/gmail.labels',
];

// The file token.json stores the user's access and refresh tokens, and is
// created automatically when the authorization flow completes for the first
// time.
const TOKEN_PATH = 'token.json';

// Load client secrets from a local file.
fs.readFile('credentials.json', (err, content) => {
  if (err) return console.log('Error loading client secret file:', err);
  // Authorize a client with credentials, then call the Gmail API.
  authorize(JSON.parse(content));
});

/**
 * Create an OAuth2 client with the given credentials, and then execute the
 * given callback function.
 * @param {Object} credentials The authorization client credentials.
 * @param {function} callback The callback to call with the authorized client.
 */
function authorize(credentials) {
  const { client_secret, client_id, redirect_uris } = credentials.installed;
  const oAuth2Client = new google.auth.OAuth2(
    client_id,
    client_secret,
    redirect_uris[0]
  );

  // Check if we have previously stored a token.
  fs.readFile(TOKEN_PATH, (err, token) => {
    if (err) return getNewToken(oAuth2Client);
  });
}

/**
 * Get and store new token after prompting for user authorization, and then
 * execute the given callback with the authorized OAuth2 client.
 * @param {google.auth.OAuth2} oAuth2Client The OAuth2 client to get token for.
 * @param {getEventsCallback} callback The callback for the authorized client.
 */
function getNewToken(oAuth2Client) {
  const authUrl = oAuth2Client.generateAuthUrl({
    access_type: 'offline',
    scope: SCOPES,
  });
  console.log('Authorize this app by visiting this url:', authUrl);
  const rl = readline.createInterface({
    input: process.stdin,
    output: process.stdout,
  });
  rl.question('Enter the code from that page here: ', code => {
    rl.close();
    oAuth2Client.getToken(code, (err, token) => {
      if (err) return console.error('Error retrieving access token', err);
      // Store the token to disk for later program executions
      fs.writeFile(TOKEN_PATH, JSON.stringify(token), err => {
        if (err) return console.error(err);
        console.log('Token stored to', TOKEN_PATH);
      });
    });
  });
}
When you run the program:
$ node getToken.js
Authorize this app by visiting this url: https://accounts.google.com/o/oauth2/v2/auth?access_type=offline&scope...<deleted>
Enter the code from that page here:
It will display the authorization URL.
Get an authorization code using the authorization URL
When accessing that URL in your browser, you hit the authorization server which asks you which gmail account to use or to sign
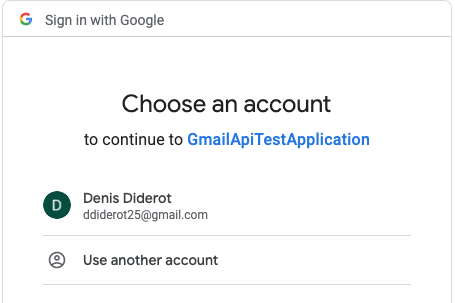
but when you select your mail, you get…
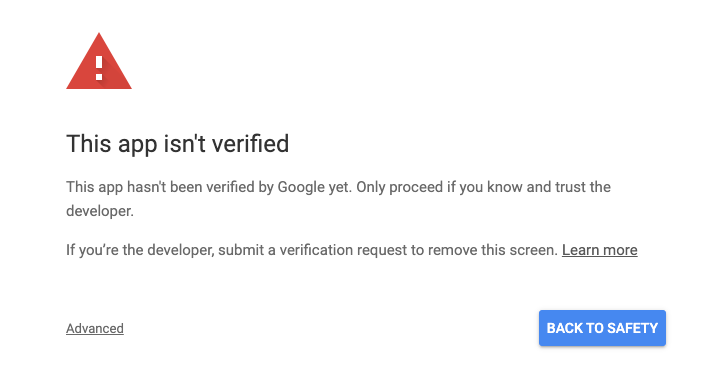
This was kind of expected with all the warnings that we had when creating the app above. As this page is not user facing in our use case, we can bypass this warning by clicking the advanced button:
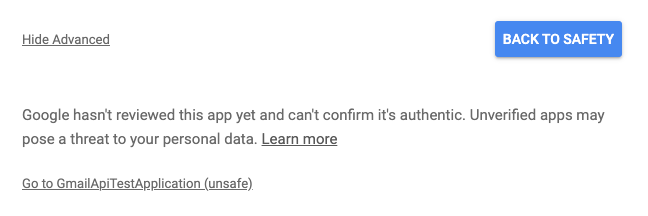
and click on the bottom link:
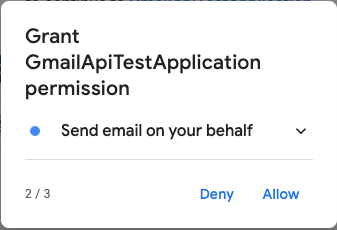
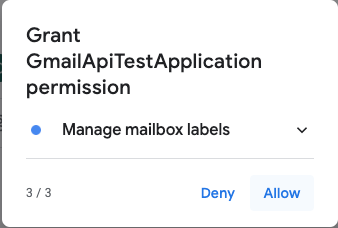
This link will show the permissions that the app is asking for so that, as the owner of the mailbox can verify and grant:
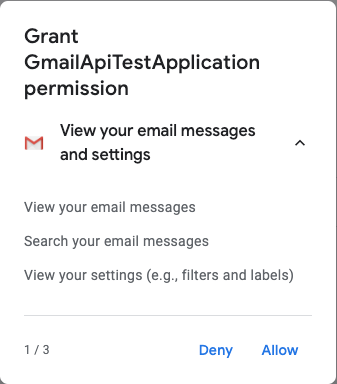
The counter at the bottom of the page (1/3) tells you that the app is requesting 3 permissions and you can selectively grant or deny those permissions
and finally
You then have a final confirmation screen:
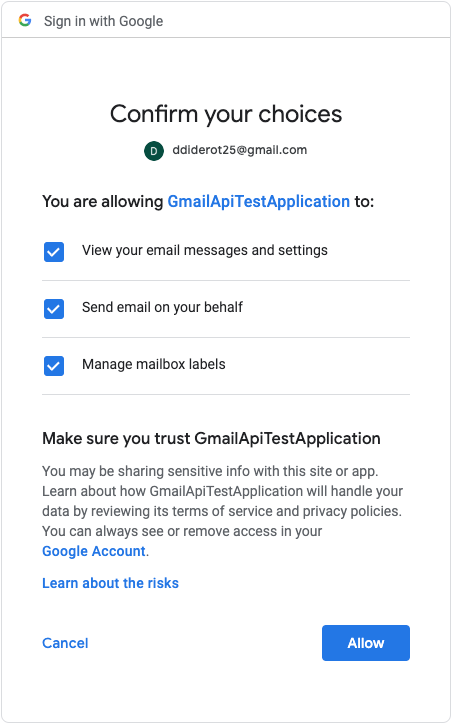
The last screen will give you the authorization code:
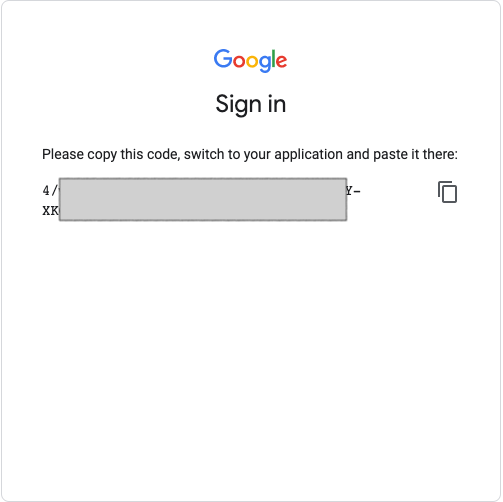
You can copy the value of this authorization code in the prompt of your command and press enter:
node getToken.js
Authorize this app by visiting this url: https://accounts.google.com/o/oauth2/...
Enter the code from that page here: 4/wA<deleted>
Token stored to token.json
The API will exchange this authorization code for your tokens and store them in your token.json file
Using the google gmail API using the tokens
Once you have the token.json file (that you also absolutely need to keep secret!) you can use the gmail API and call the APIs that are allowed by the scopes you requested.
You can have a reusable function which will give you access to an oAut2Client:
const fs = require('fs');
const {google} = require('googleapis');

// The file token.json stores the user's access and refresh tokens
const TOKEN_PATH = 'token.json';
const CREDENTIALS_PATH = 'credentials.json';

module.exports = function() {
  return new Promise((resolve, reject) => {
    // Load client secrets from a local file.
    fs.readFile(CREDENTIALS_PATH, (err, credentialsContent) => {
      if (err) {
        return reject('Error loading client secret file');
      }
      const credentials = JSON.parse(credentialsContent);
      fs.readFile(TOKEN_PATH, (err, tokenContent) => {
        if (err) {
          return reject('Error loading tokens');
        }
        const token = JSON.parse(tokenContent);
        const { client_secret, client_id, redirect_uris } = credentials.installed;
        const oAuth2Client = new google.auth.OAuth2(
          client_id,
          client_secret,
          redirect_uris[0]
        );

        oAuth2Client.setCredentials(token);
        return resolve(oAuth2Client);
      });
    });
  });
}
Retrieve the list of labels
The code below will retrieve the list of labels associated to your mailbox (error checking code omitted for brevity):
const {google} = require('googleapis');
const getOauth2Client = require('./getOauth2Client');

getOauth2Client()
  .then((auth) => {
    const gmail = google.gmail({version: 'v1', auth});
    gmail.users.labels.list({
      userId: 'me',
    }, (err, res) => {
      if (err) return console.log('The API returned an error: ' + err);
      const labels = res.data.labels;
      if (labels.length) {
        console.log('Labels:');
        labels.forEach((label) => {
          console.log(`- ${label.name}`);
        });
      } else {
        console.log('No labels found.');
      }
    });
  });
Send an email
the following code will send an email on ‘your’ behalf (error checking code omitted for brevity).
const { google } = require('googleapis');
const getOauth2Client = require('./getOauth2Client');

getOauth2Client().then(auth => {
  var gmailClass = google.gmail({
    version: 'v1',
    auth: auth,
  });

  var email_lines = [];

  email_lines.push('From: "test" <ddiderot25@gmail.com>');
  email_lines.push('To: pcarion@gmail.com');
  email_lines.push('Content-type: text/html;charset=iso-8859-1');
  email_lines.push('MIME-Version: 1.0');
  email_lines.push('Subject: this would be the subject');
  email_lines.push('');
  email_lines.push('And this would be the content.<br/>');
  email_lines.push('The body is in HTML so <b>we could even use bold</b>');

  var email = email_lines.join('\r\n').trim();

  // // The body needs to be base64url encoded.
  var base64EncodedEmail = Buffer.from(email).toString('base64');
  base64EncodedEmail = base64EncodedEmail
    .replace(/\+/g, '-')
    .replace(/\//g, '_')
    .replace(/=+$/, '');
  gmailClass.users.messages.send({
    userId: 'me',
    resource: {
      raw: base64EncodedEmail,
    },
  })
  .then((...args) => {
    console.log('cb:', args);
  });
});
List of emails
the following code will list the messages currently in your mail box (pagination code not implemented)
const { google } = require('googleapis');
const getOauth2Client = require('./getOauth2Client');

getOauth2Client().then(auth => {
  var gmail = google.gmail({
    version: 'v1',
    auth: auth,
  });

  gmail.users.messages.list(
    {
      userId: 'me',
    },
    (err, res) => {
      if (err) {
        return console.log('The API returned an error: ' + err);
      } else {
        console.log(JSON.stringify(res, null, '  '));
      }
    }
  );
});
Enjoy!