Introduction
Matrix is an open standard for decentralized, real-time communication.
When you install your own Matrix homeserver you can communicate with users having having accounts on different providers via chat or voice other IP.
Basically, with Matrix, you can host your own slack or discord server.
Through the use of bridges, you can even communicate with users on IRC, Slack, Discord, Telegram etc…
The main Matrix Homeserver reference implementation is Synapse: this is a python 3 implementation that you can install on your own server or run using docker.
There is another implementation, named Dendrite: it is also maintained by the Matrix foundation and is written in go.
The Dendrite description states: Dendrite is a second-generation Matrix homeserver written in Go. It intends to provide an efficient, reliable and scalable alternative to Synapse.
In this document, I will show how to install Dendrite on an ubuntu server. I will be using Digital Ocean but the instructions should work with any hosting provider.
Requirements
The requirements to install Dendrite are:
- a Go compiler. Minimum version is Go 1.15.
- a domain name
- a valid TLS certificate. We will use Let’s Encrypt as a trusted authority for that domain
- a PostgreSQL database
- a reverse proxy. We will use Nginx.
Ubuntu Setup
create Ubuntu server
My ubuntu server will be hosted on Digital Ocean (referral link that gives you $100 in credit over 60 days), but any Ubuntu hosting provider should work.
If you use Digital Ocean, my recommendations are:
- use the latest Ubuntu server (was
20.04 (LTS) x64at the time I wrote that document) - you can use the cheapest droplet ($5 a month) to start with: Basic Shared CPU, regular Intel with SSD.
- choose a region that is the closest to you
- use a “SSH key” for authentication. It is safer, and more convenient, than a password authentication. I named my SSH key
id_droplet_rsa
Once the droplet is created, you will get the IP address and then you can log as root:
ssh -i ~/.ssh/id_droplet_rsa root@your.ip.address
DNS setup
Once you have your IP, update your DNS server to add 3 A records pointing to your IP address:
yourdomain.comwww.yourdomain.commatrix.yourdomain.com
It takes time for the DNS updates to propagate, so better to do that early in the process.
security first
The first step is to make sure that your distribution is up to date.
Update existing packages:
apt update
To see the list of upgradable packages
apt list
To upgrade all those packages:
apt dist-upgrade -y
You can then reboot your server with the command
reboot
Once the server is restarted, you can log back in again as root. That should be the last time you connect as root.
create dendrite user
For obvious security reasons, you don’t want to use the root account to setup your server.
To create a dendrite user, while you are logged in as root, just type:
adduser dendrite
The command will prompt with a couple of questions. Make sure to write down the password you choose for that user.
You still want to be able to run command as root, so you need to give the sudo permission to that user:
usermod -aG sudo dendrite
Finally, you want also to be able to directly connect to the box with that user through SSL. As the root user is already setup for that, you can copy over its SSH authorized key file:
$ mkdir ~dendrite/.ssh
$ cp ~/.ssh/authorized_keys ~dendrite/.ssh/
$ chown -R dendrite:dendrite ~dendrite/.ssh
You should be able to login to your server directly with the dendrite user account:
ssh -i ~/.ssh/id_droplet_rsa dendrite@your.ip.address
install zsh and oh-my-zsh
This is NOT a required step, but this will give you IMHO more comfort if you do it:
$ sudo apt install zsh
$ chsh -s $(which zsh)
The command above make zsh your default shell.
sh -c "$(wget https://raw.github.com/ohmyzsh/ohmyzsh/master/tools/install.sh -O -)"
One last time, log out and log back in as the dendrite user
Dendrite installation
Polylith or Monolith?
There are multiple ways to install a Dentrite homeserver and the installation document describes those options.
A Dentrite homeserver is a collection of services that provide the required functionalities.
You can decide to install all those services as standalone components (Polylith mode). In that mode you also need to install Apache Kafka as the event streaming system to allow those components to communicate with each other.
You can also decide to run all those components in a single process (Monolith mode). This mode will use Naffka to emulate an in memory Kafka.
The persistent can be done either using SQLite (files storage) or a Postgres database.
As recommended in the installation document, we will install Dendrite in monolith mode with a PostgreSQL database.
Postgres installation
Standard way to install Postgres:
sudo apt install postgresql postgresql-contrib
Create a user in postgres named dendrite
sudo -u postgres createuser -P dendrite
Take note of the password you used here as we will need it during the configuration phase.
Each Dendrite service needs a database access.
You have 2 options:
- create a different database for each service
- share the same database between all services.
I opted for the simplest solution and created a shared database:
sudo -u postgres createdb -O dendrite dendrite
If you need to connect to the PostgreSQL cli, you can just switch to the postgres user and start the psql cli:
sudo -i -u postgres
psql -d dendrite
Dendrite build
As mentioned in the introduction, Dendrite is written in Go.
We need first to install Go (see installation instructions here). You also need to have gcc installed on your server:
sudo apt install gcc
wget https://golang.org/dl/go1.17.2.linux-amd64.tar.gz
sudo tar -C /usr/local -xzf go1.17.2.linux-amd64.tar.gz
You then need to add the go binaries in your path: add that line at the top of your ~/.zshrc file:
export PATH=$PATH:/usr/local/go/bin
Log out and log back in for the change of path to take place.
You can check that go is properly installed with:
$ go version
go version go1.17.2 linux/amd64
Now is time to build Dendrite:
git clone https://github.com/matrix-org/dendrite
cd dendrite
./build.sh
This make take a little bit of time, but at the end, you’ll find all the binaries you need in the bin directory.
Dendrite configuration
You need a private key that will be used to sign some Matrix messages:
./bin/generate-keys --private-key matrix_key.pem
Dendrite relies on a single configuration file names dendrite.yaml — you can use the dendrite-config.yaml as a starting point:
cp dendrite-config.yaml dendrite.yaml
The installation document will describe the configuration change to be done on that file:
- update
server_name - update the various database configuration to use your local PostgreSQL instance. The sample config file is configured to use SQLite. We replace the file path with the PostgreSQL connection string (with your dendrite user password)
- enable naffka (parameter
use_naffkaalready set to true in the sample config file)
Once done, the diff with the original sample config file should look like:
$ diff dendrite.yaml dendrite-config.yaml

<   server_name: <yourdomain>.com
---
>   server_name: localhost
127c127
<     connection_string: postgres://dendrite:<db dendrite password>@localhost/dendrite
---
>     connection_string: file:appservice.db
207c207
<     connection_string: postgres://dendrite:<db dendrite password>@localhost/dendrite
---
>     connection_string: file:federationsender.db
233c233
<     connection_string: file:federationsender.db
---
>     connection_string: file:keyserver.db
246c246
<     connection_string: postgres://dendrite:<db dendrite password>@localhost/dendrite
---
>     connection_string: file:mediaapi.db
285c285
<     connection_string: postgres://dendrite:<db dendrite password>@localhost/dendrite
---
>     connection_string: file:mscs.db
296c296
<     connection_string: postgres://dendrite:<db dendrite password>@localhost/dendrite
---
>     connection_string: file:roomserver.db
307c307
<     connection_string: postgres://dendrite:<db dendrite password>@localhost/dendrite
---
>     connection_string: file:signingkeyserver.db
336c336
<     connection_string: postgres://dendrite:<db dendrite password>@localhost/dendrite
---
>     connection_string: file:syncapi.db
359c359
<     connection_string: postgres://dendrite:<db dendrite password>@localhost/dendrite
---
>     connection_string: file:userapi_accounts.db
364c364
<     connection_string: postgres://dendrite:<db dendrite password>@localhost/dendrite
---
>     connection_string: file:userapi_devices.db
At that stage, you can already start your dendrite monolith:
➜  dendrite git:(master) ./bin/dendrite-monolith-server
INFO[2021-10-30T02:24:04.485666401Z] [base.go:114] NewBaseDendrite
	 Dendrite version 0.5.0+92026a73
2021/10/30 02:24:04 OK    20200929203058_is_active.go
INFO[2021-10-30T02:24:04.647914166Z] [signingkeyserver.go:103] NewInternalAPI
	 Enabled perspective key fetcher               num_public_keys=2 server_name=matrix.org
2021/10/30 02:24:04 OK    20201028212440_add_forgotten_column.go
WARN[2021-10-30T02:24:04.751411566Z] [2021041615092700_state_blocks_refactor.go:45] UpStateBlocksRefactor
	 Performing state storage upgrade. Please wait, this may take some time!
WARN[2021-10-30T02:24:04.769927171Z] [2021041615092700_state_blocks_refactor.go:101] UpStateBlocksRefactor
	 New tables created...
WARN[2021-10-30T02:24:04.774326319Z] [2021041615092700_state_blocks_refactor.go:313] UpStateBlocksRefactor
	 State storage upgrade complete
2021/10/30 02:24:04 OK    2021041615092700_state_blocks_refactor.go
INFO[2021-10-30T02:24:05.077539949Z] [base.go:432] func2
	 Starting external Monolith listener on :8008
Things are already looking good here, but there is still some configuration to be done to make that server available on the internet.
Reverse proxy setup: Nginx
In order for your server to be available on the Internet, over SSL, you need to setup a reverse proxy in front of your Dentrite server.
First things first, install nginx:
sudo apt install nginx
To configure nginx, it is simpler to create a new configuration file in your /etc/nginx/sites-available directory: <yourdomain>.com file
and, using that file as a starting point, the content of this file should be:
server {
    listen 80;
    listen [::]:80;

    root /var/www/html;
    index index.html ;
    server_name <yourdomain>.com www.<yourdomain>.com matrix.<yourdomain>.com;

    proxy_set_header Host      $host;
    proxy_set_header X-Real-IP $remote_addr;
    proxy_read_timeout         600;

    location /.well-known/matrix/server {
        return 200 '{ "m.server": "matrix.<yourdomain>.com:443" }';
    }

    location /.well-known/matrix/client {
        # If your sever_name here doesn't match your matrix homeserver URL
        # (e.g. hostname.com as server_name and matrix.hostname.com as homeserver URL)
        add_header Access-Control-Allow-Origin '*';
        return 200 '{ "m.homeserver": { "base_url": "https://matrix.<yourdomain>.com" } }';
    }

    location /_matrix {
        proxy_pass http://localhost:8008;
    }
}
You could remove the default configuration: /etc/nginx/sites-enabled/default
and link your new configuration
sudo ln -s /etc/nginx/sites-available/<yourdomain>.com /etc/nginx/sites-enabled/<yourdomain>.com
You can check that the configuration is valid:
$ nginx -t
nginx: the configuration file /etc/nginx/nginx.conf syntax is ok
nginx: configuration file /etc/nginx/nginx.conf test is successful
Firewall setup
You need to configure your firewall to open the required ports:
$ ufw allow 'Nginx HTTPS'
$ ufw allow 'Nginx HTTP'
SSL setup: Let’s encrypt
In order to properly secure your setup, you need to add a SSL certificate.
We will be using Let’s encrypt as the certificate authority:
$ sudo apt install certbot python3-certbot-nginx
The setup is really easy: you list on the command line the domain for which you want a certificate. The --nginx option will tell the tool to patch the nginx configuration file foe you:
$ sudo certbot --nginx -d <your domain>.com -d www.<your domain>.com -d matrix.<your domain>.com
The process is automatic and at the end you should request to redirect the http traffic to https:
Saving debug log to /var/log/letsencrypt/letsencrypt.log
Plugins selected: Authenticator nginx, Installer nginx
Obtaining a new certificate
Performing the following challenges:
http-01 challenge for www.<your domain>.com
Waiting for verification...
Cleaning up challenges
Deploying Certificate to VirtualHost /etc/nginx/sites-enabled/<your domain>.com
Deploying Certificate to VirtualHost /etc/nginx/sites-enabled/<your domain>.com
Deploying Certificate to VirtualHost /etc/nginx/sites-enabled/<your domain>.com

Please choose whether or not to redirect HTTP traffic to HTTPS, removing HTTP access.
- - - - - - - - - - - - - - - - - - - - - - - - - - - - - - - - - - - - - - - -
1: No redirect - Make no further changes to the webserver configuration.
2: Redirect - Make all requests redirect to secure HTTPS access. Choose this for
new sites, or if you're confident your site works on HTTPS. You can undo this
change by editing your web server's configuration.
- - - - - - - - - - - - - - - - - - - - - - - - - - - - - - - - - - - - - - - -
Select the appropriate number [1-2] then [enter] (press 'c' to cancel): 2
Redirecting all traffic on port 80 to ssl in /etc/nginx/sites-enabled/<your domain>.com
Redirecting all traffic on port 80 to ssl in /etc/nginx/sites-enabled/<your domain>.com
Redirecting all traffic on port 80 to ssl in /etc/nginx/sites-enabled/<your domain>.com

- - - - - - - - - - - - - - - - - - - - - - - - - - - - - - - - - - - - - - - -
Congratulations! You have successfully enabled https://<your domain>.com,
https://www.<your domain>.com, and https://matrix.<your domain>.com

You should test your configuration at:
https://www.ssllabs.com/ssltest/analyze.html?d=<your domain>.com
https://www.ssllabs.com/ssltest/analyze.html?d=www.<your domain>.com
https://www.ssllabs.com/ssltest/analyze.html?d=matrix.<your domain>.com
- - - - - - - - - - - - - - - - - - - - - - - - - - - - - - - - - - - - - - - -

IMPORTANT NOTES:
 - Congratulations! Your certificate and chain have been saved at:
   /etc/letsencrypt/live/<your domain>.com/fullchain.pem
   Your key file has been saved at:
   /etc/letsencrypt/live/<your domain>.com/privkey.pem
   Your cert will expire on 2022-01-28. To obtain a new or tweaked
   version of this certificate in the future, simply run certbot again
   with the "certonly" option. To non-interactively renew *all* of
   your certificates, run "certbot renew"
 - If you like Certbot, please consider supporting our work by:

   Donating to ISRG / Let's Encrypt:   https://letsencrypt.org/donate
   Donating to EFF:                    https://eff.org/donate-le

➜  ~
The setup also creates a service to renew the certificate for you automatically:
sudo systemctl status certbot.timer
Let’s pause for a minute and thank Let’s encrypt for such a smooth process.
Dendrite installation test
At this stage, your server is fully configured.
You can test the setup with this API call:
https://matrix.<your domain>.com/_matrix/federation/v1/version

{
	"server":{
		"version":"0.5.0+92026a73",
    "name":"Dendrite"
  }
}
If you have the same response as above, your installation is probably correct!
The real test is to connect to your server with a real Matrix client!
Before doing that, you need to create a user to be able to login.
The dendrite binaries give you an easy way to create a user:
./bin/create-account --config dendrite.yaml -username <your user name> -ask-pass
Write down the user name and password you just created an go to:
https://riot.im/app/#/login
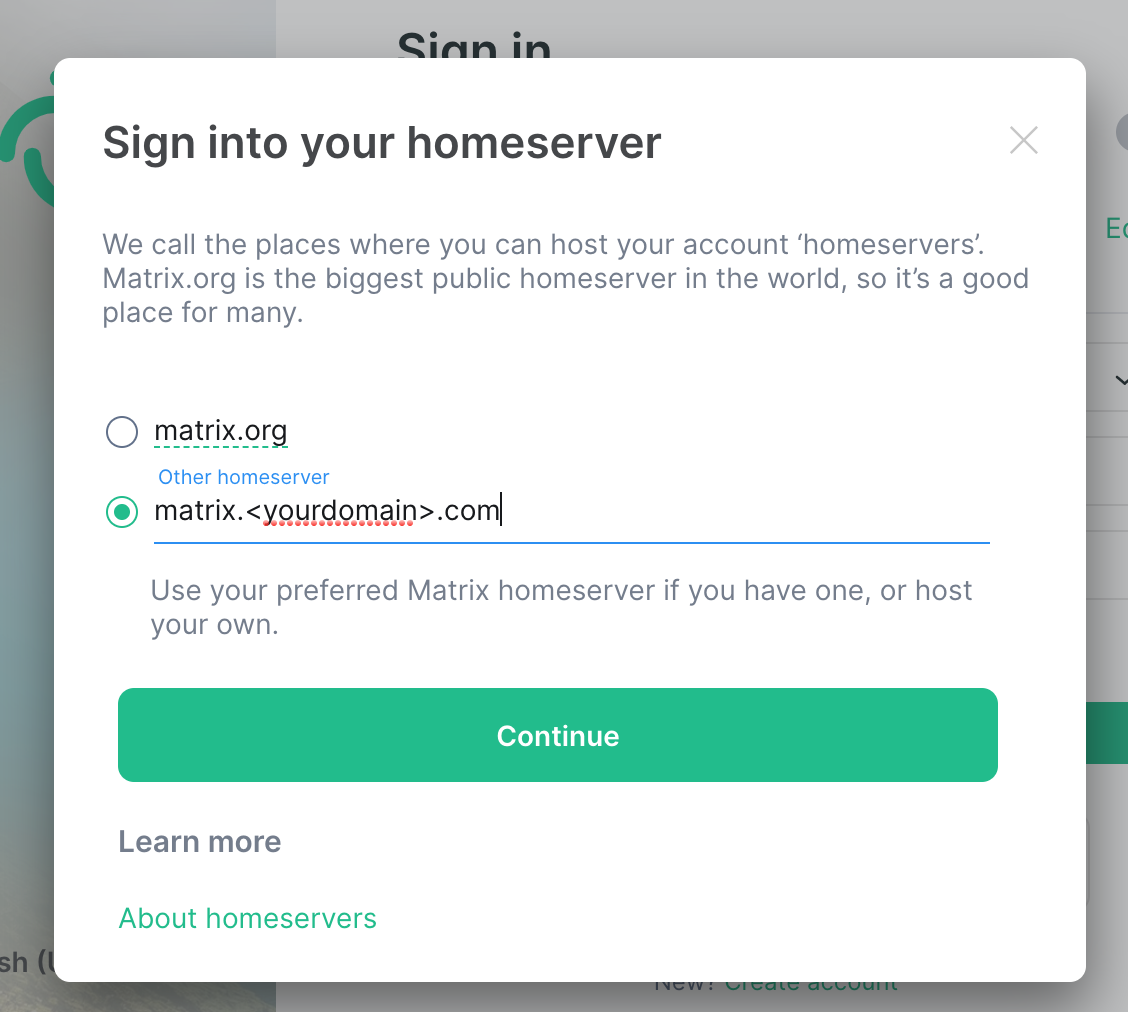
You will be presented the login screen:
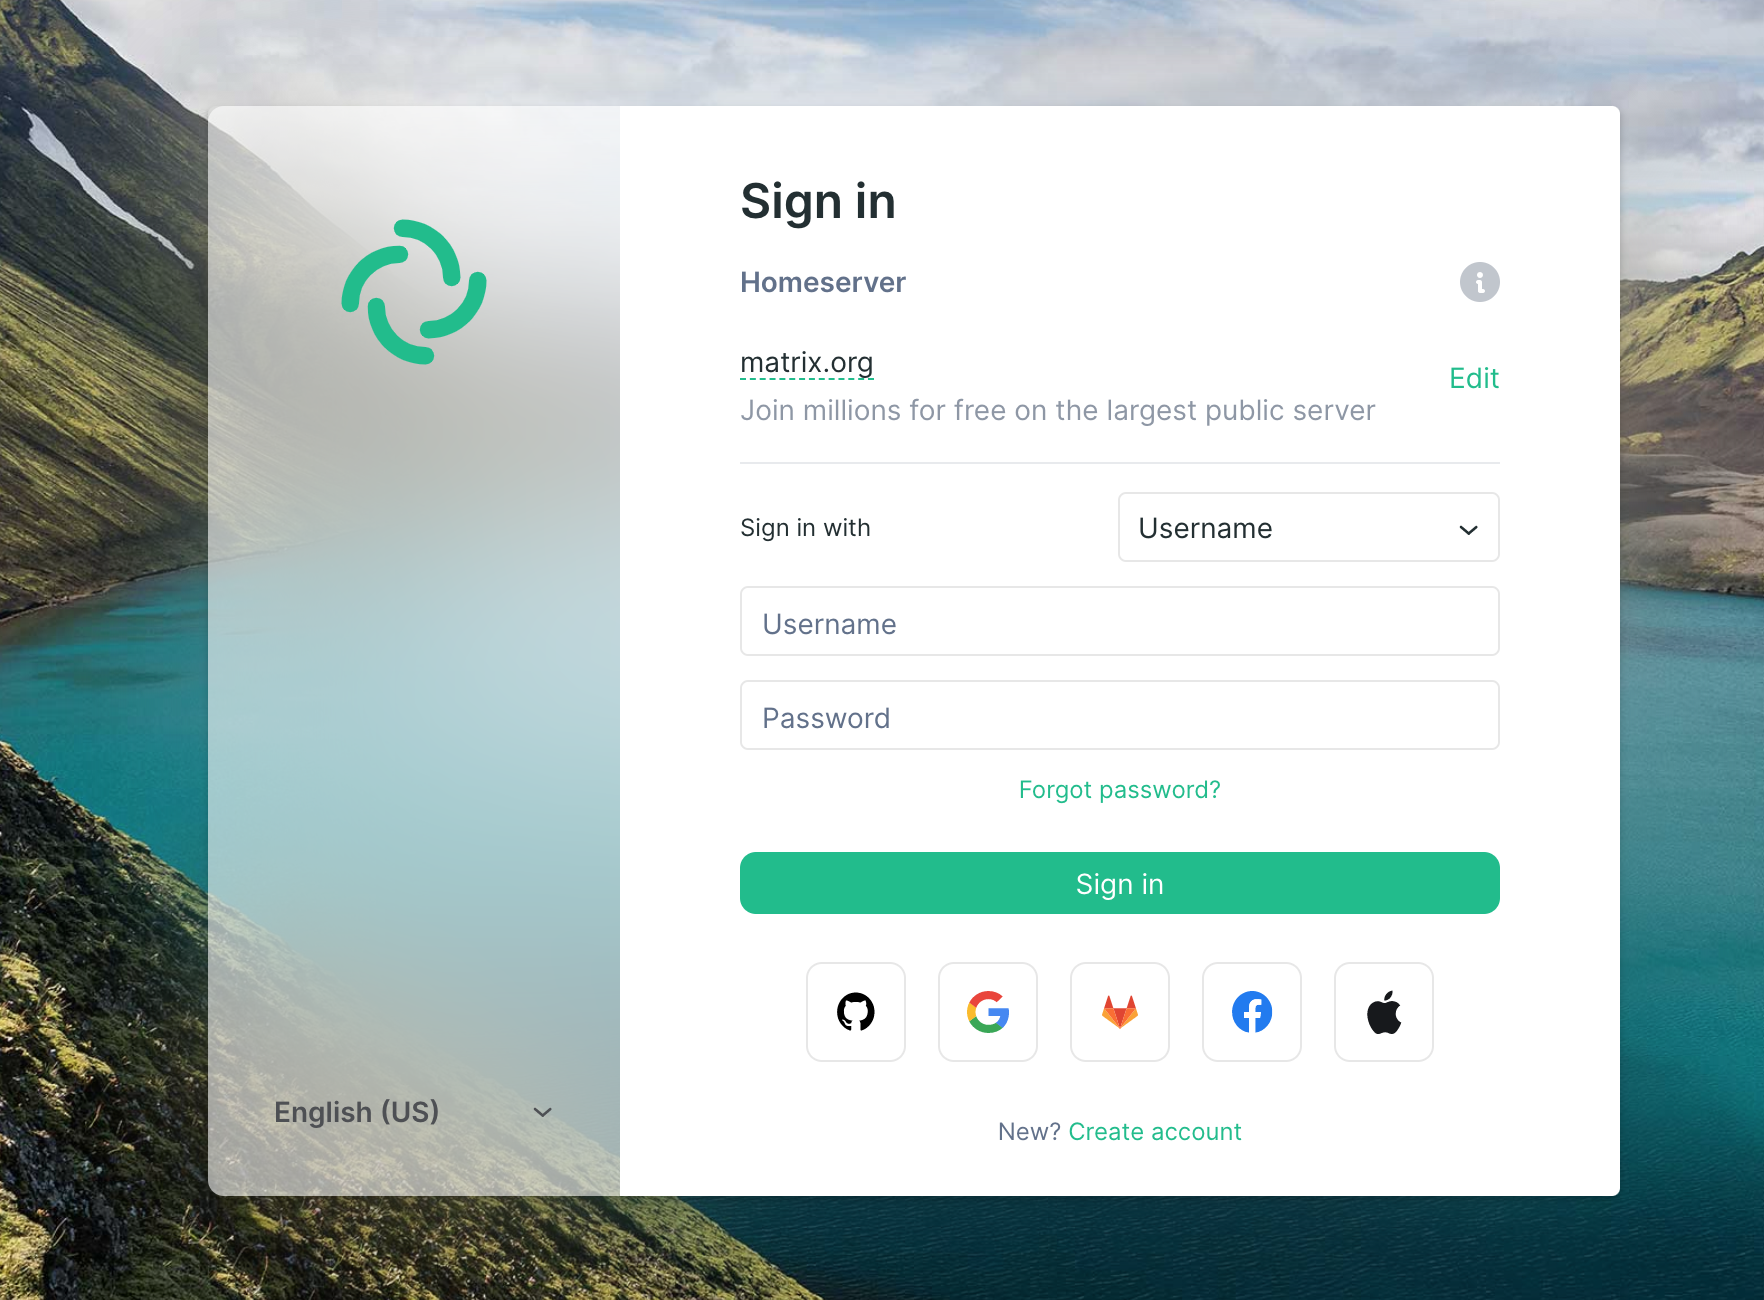
You need to change the Homserver URL to be your domain matrix.yourdomain.com by clicking on the edit button on the right side of matrix.org
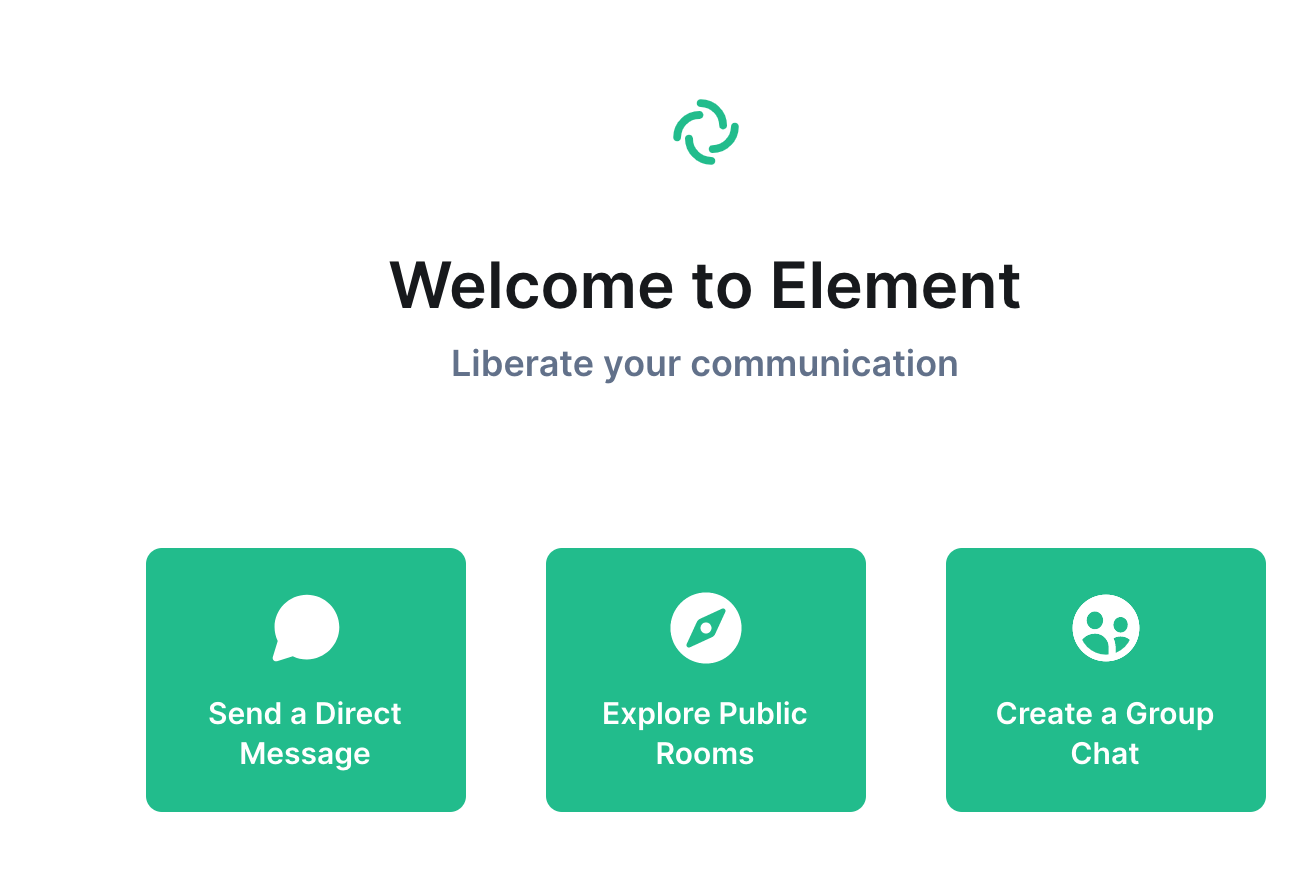
After clicking on continue, enter the user name and password of the user you just created with the cli… and here we are! you are logged in to your own Matrix server:
Create a dendrite service
Right now, the service is started manually is started from the cli from the dendrite user home directory… that’s obviously not a good practice.
The proper way is to create a service to properly start your dendrite server.
The installation directories for dendrite will be
- binaries in
/opt/dendrite - configuration files in
/etc/dendrite - logs in
/var/log/dendrite
sudo mkdir /opt/dendrite /var/log/dendrite /etc/dendrite
copy files in destination directories:
sudo cp -R ~dendrite/dendrite/bin /opt/dendrite
sudo cp ~dendrite/dendrite/matrix_key.pem /etc/dendrite
sudo cp ~dendrite/dendrite/dendrite.yaml /etc/dendrite
The monolith expects to find the dendrite configuration file in its working directory, so let make that happen with a symbolic link:
sudo ln -s /etc/dendrite/dendrite.yaml /opt/dendrite/dendrite.yaml
Give the proper permissions to the installation directories:
sudo chown -R dendrite:dendrite /opt/dendrite
sudo chown -R dendrite:dendrite /etc/dendrite
sudo chown -R dendrite:dendrite /var/log/dendrite
You need to update the new config file /etc/dendrite/dendrite.yaml to take into account this new setup.
There is only one line to change:
private_key: /etc/dendrite/matrix_key.pem
Finally, you need to create the service file: /etc/systemd/system/dendrite.service :
[Unit]
Description=Dendrite (Matrix Homeserver)
After=syslog.target
After=network.target
After=postgresql.service

[Service]
RestartSec=2s
Type=simple
User=dendrite
Group=dendrite
WorkingDirectory=/opt/dendrite/
ExecStart=/opt/dendrite/bin/dendrite-monolith-server
Restart=always

[Install]
WantedBy=multi-user.target
and then you enable the service:
sudo systemctl enable dendrite --now
You can check that it is running with:
➜  dendrite git:(master) sudo systemctl status  dendrite
● dendrite.service - Dendrite (Matrix Homeserver)
     Loaded: loaded (/etc/systemd/system/dendrite.service; enabled; vendor preset: enabled)
     Active: active (running) since Sat 2021-10-30 19:20:36 UTC; 48s ago
   Main PID: 4475 (dendrite-monoli)
      Tasks: 5 (limit: 1136)
     Memory: 8.8M
     CGroup: /system.slice/dendrite.service
             └─4475 /opt/dendrite/bin/dendrite-monolith-server

Oct 30 19:20:36 dendrite systemd[1]: Started Dendrite (Matrix Homeserver).
Oct 30 19:20:36 dendrite dendrite-monolith-server[4475]: time="2021-10-30T19:20:36.448108845Z" level=info msg="Dendrite version 0.5.0+92026a73" func="NewBaseDendrite\n\t" file=" [base.go:114]"
Oct 30 19:20:36 dendrite dendrite-monolith-server[4475]: 2021/10/30 19:20:36 OK    20200929203058_is_active.go
and check the logs in real time with:
sudo journalctl -u dendrite -f
Enjoy!
References
- the official dendrite distribution site: here
- the specific dendrite installation document
- a document describing the installation of synapse (official version in python 3)
- another document describing how to install dendrite. I borrowed the service setup from that document